
Table of Contents
Hello learners! Are you also looking for a proper guide to Adobe Photoshop Masking Course? If yes, you will be happy to know that you’ve landed at the right place. Being an avid lover who loves clicking photos, there’s always a desire to edit the final photo with a flawless blend of colors and transparency.
Well, creating such stunning images is totally secret. But, Skilcamp is here to reveal this to you. Yes, you’re reading right! Want to dip into the glamorous appearances? Then you must tap into learning creative layer masking.
Didn’t understand what we were saying? No worries, our friends! This guide is foremost for beginners. So, all those picture lovers, want to create those intriguing images of yours? Then this guide will be an absolute game-changer for you.
Here we will break down everything about the Professional Photoshop Masking Course as well as cover some advanced layer mask techniques that will surely help you achieve what you want. Be with us and take that step closer to becoming an expert.
What is Layer Masking?
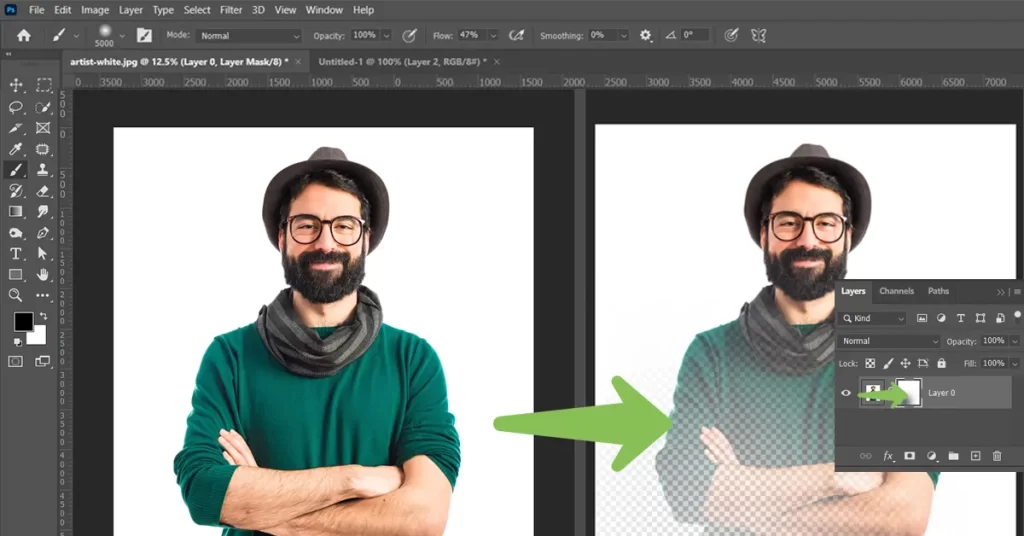
Let us first start with what creative layer masking stands for. To be simple, creative layer masking is a technique used to adjust the transparency of certain parts of a layer without making permanent changes.
Unlike the Eraser Tool, which permanently removes parts of the layer, creative layer masking lets you make changes that you can easily undo or modify later. This means the original image stays the same, giving you the freedom to experiment and make adjustments without losing any of the original content.
Now let us find out why learning the Photoshop Masking Techniques Course matters in today’s time.
Why Mastering Layer Mask Matters?
Mastering layer masks matters a lot on today’s date. Some of the major reasons include-
- Apply Adjustments Non-Destructively
The first reason why the Photoshop Masking Skills Course matters is that it helps to apply the adjustments non-destructively. Normally, creative layer masking allows you to make changes to your images without altering the original.
In the past, it was mostly required to create a copy of the image to protect the original. But, by mastering layer masks, you can make adjustments while keeping the original intact.
- Easily Refine Your Edits
The second reason why Adobe Photoshop Masking Course matters is that it allows you to refine edits easily. Typically, using creative layer masking instead of erasing parts of an image, you can correct mistakes and make adjustments later on. That is to say, you can target specific areas of an image for edits, rather than applying changes to the entire image.
- Enhance Your Work with Smart Objects
The next reason why the Professional Photoshop Masking Course matters is that it enables you to work with smart objects.
Normally, smart objects are incredibly useful for photographers and designers, as they allow you to make edits without changing the original image. By mastering layer masks, converting a layer to a smart object becomes straightforward, enhancing your editing flexibility.
- Control Layer Opacity Selectively
Another reason why mastering advanced layer mask techniques matters is that it helps you selectively change layer opacity. Normally, layer masks can adjust the transparency of specific parts of a layer. That is to say, you can make certain areas more or less transparent without affecting the entire layer.
- Seamlessly Blend Edges
Another reason why mastering the Adobe Photoshop Masking Course matters is that it helps you blend edges with gradient adjustments. Normally, when blending two images, layer masks can help you create smooth transitions. In short, you can use gradients to soften the edges and make the merge look seamless.
That’s it! These are some of the top 5 reasons that clearly show how mastering layer masks is the key. Now, let us check out how to Add creative layer masking in Adobe Photoshop.
Top 3 Ways For Adding Creative Layer Masking on Adobe
There are three most common ways for adding creative layer masking on Adobe Photoshop. Let us check each of these individually.
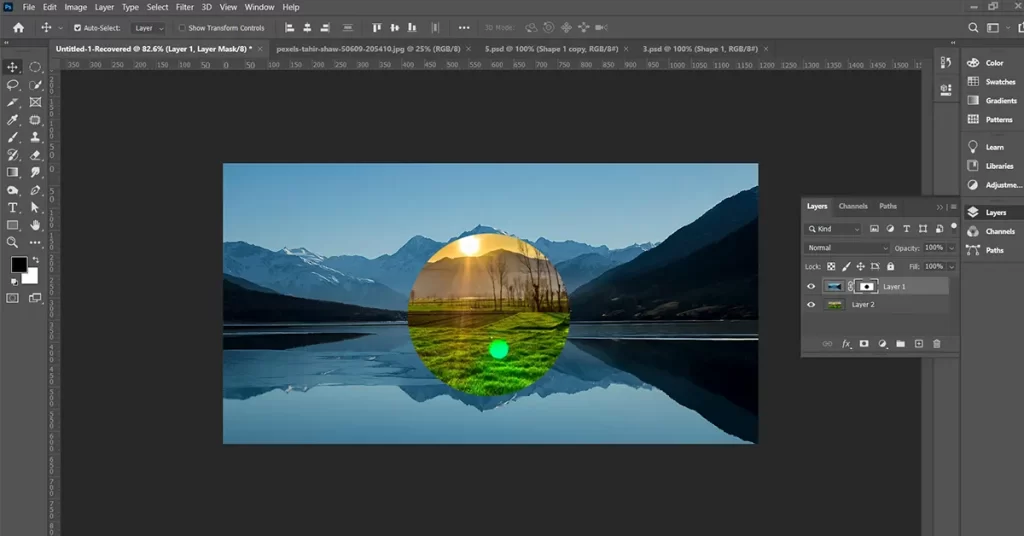
1st Way: Adding a Layer Mask Using the Layer Mask Icon
To add a creative layer masking using the Layer Mask icon follow these easy steps:
- First, select the layer to which you want to add a Layer Mask.
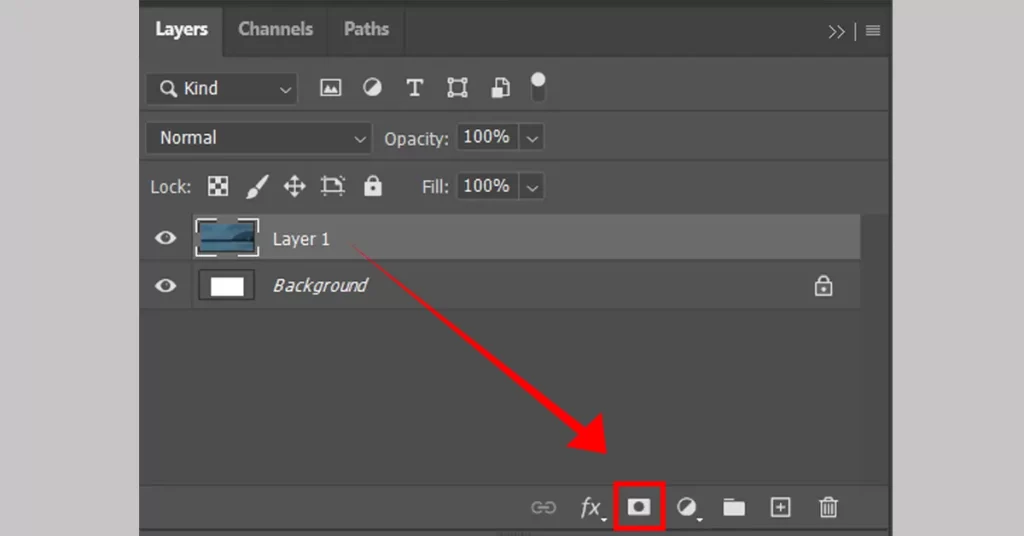
2. Next, click on the “Add Layer Mask” icon, located at the bottom of the Layers panel.
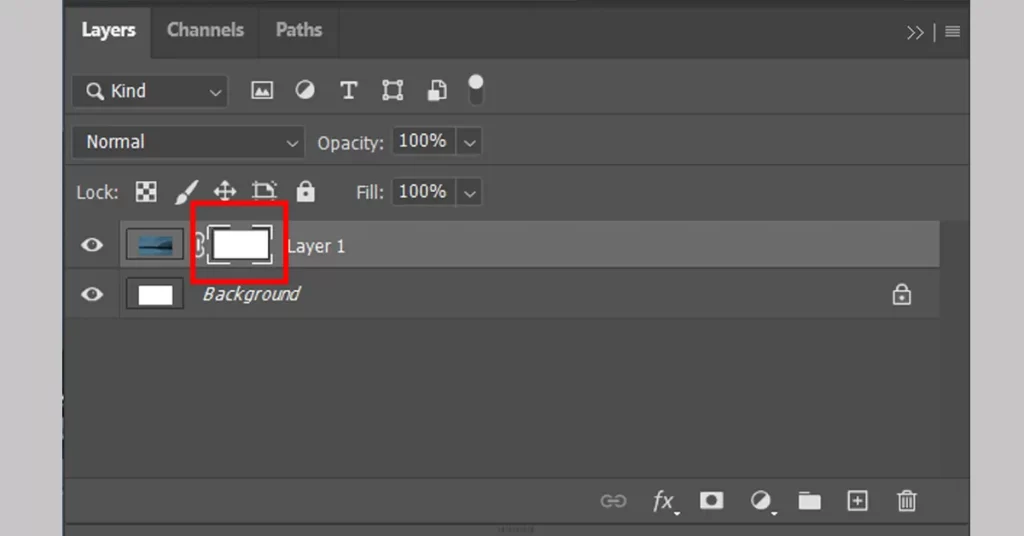
3. After that, a white rectangular thumbnail will appear next to the layer thumbnail, representing the newly added Layer Mask.
4. Finally, select this Layer Mask thumbnail to perform any operations on it.
2nd Way: Adding a Layer Mask Using Selections
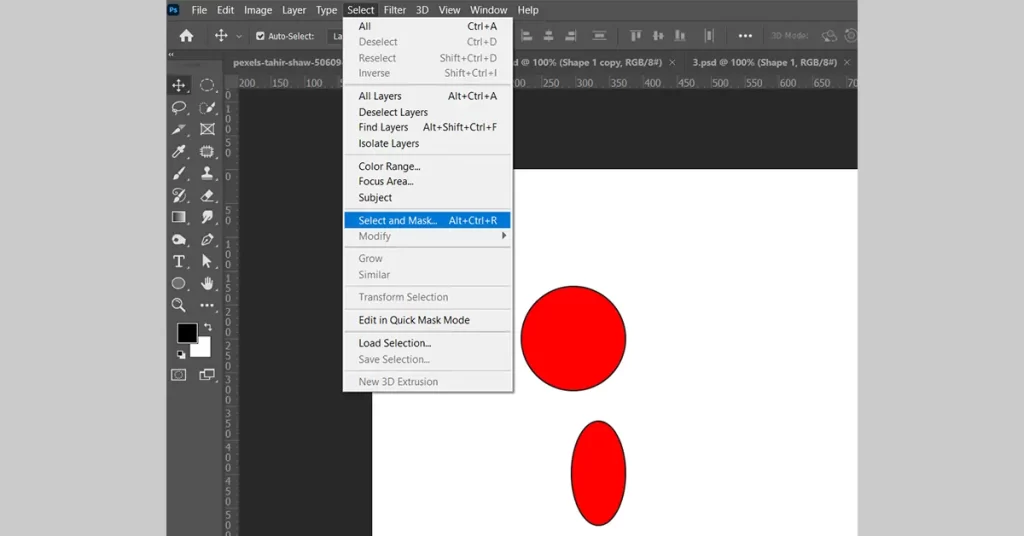
To add a creative layer masking using Selections options follow these easy steps:
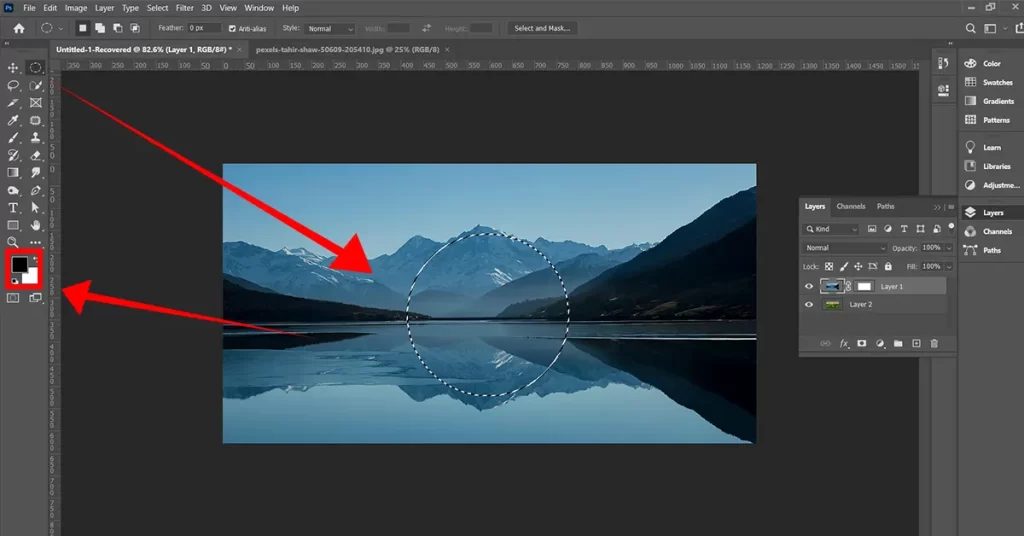
- In the first step, use a selection tool (e.g., Marquee, Lasso, or Magic Wand) to outline the area you want to isolate on your image.
- Secondly, select the layer you want to add a mask to in the Layers panel.
- In the third step, click the “Add Layer Mask” icon at the bottom of the Layers panel.
- Finally, Photoshop will create a layer mask based on your selection, with the selected area appearing white (visible) and the rest black (hidden).
This technique using Selection is great for isolating specific areas of your image for further editing or blending.
3rd Way: Adding a Layer Mask Using Brush Tool
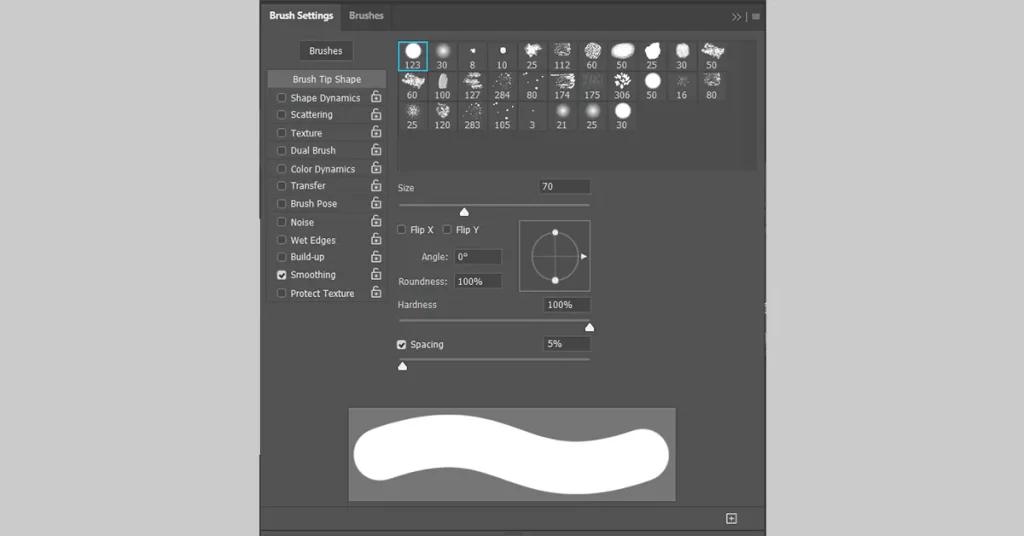
To add a creative layer masking using Brush Tool options follow these easy steps:
- In the first step, add a layer mask to your desired layer by clicking the “Add Layer Mask” icon in the Layers panel.
- Secondly, select the Brush Tool (B) from the Tools panel.
- After that, set your foreground color to black, white, or a shade of gray, depending on whether you want to hide, reveal, or partially show the layer.
- Then, adjust the brush size, hardness, and opacity to suit your needs.
- Finally, paint directly on the layer mask thumbnail in the Layers panel to hide or reveal specific parts of the layer.
This technique of layer mask gives you precise control over the visibility of your layer. Allowing for smooth transitions and seamless blending between layers.
So, learners, did you find mastering the Adobe Photoshop Masking Course simple? Sure, this must be one of the easiest guides to learning advanced layer mask techniques.
Now that you are aware of some of the basics for mastering layer masks. Let us get into the quick tips for creative layer masking. Trust us, these tips on the Photoshop Masking Skills Course will be a game-changing opportunity for you.
Top 10 Tips For Mastering Layer Masks In Adobe Photoshop in 2024
Here you go to check out some of our favorites for mastering layer masks like a pro!
- Start with Black or White Layer Masks
The first tip for mastering Adobe Photoshop Masking Course like a pro is to use black or white layer masks to control the visibility of different parts of a layer in Photoshop. Ideally, by default, a white layer mask will keep the layer fully visible.
However, if you want to hide the entire layer, you can fill the mask with black. To streamline this process more smoothly:
- Hold the ALT key + Click on the Add a Layer Mask icon
- Move Layers and Layer Masks Independently
The second tip for mastering the Professional Photoshop Masking Course involves moving layers and layer masks separately.
For this, you need to click on the chain icon between the layer preview and layer mask preview. This will unlink them and move them separately.
- Create Layer Masks from a Selection
The third tip for mastering Photoshop Masking Techniques Course like a pro is about creating a layer mask from a selection. In Adobe, you can turn any selection into a layer mask to hide or show specific details.
For this:
- Create a selection using any tool + Click on the Layer Mask icon = Apply the mask to the layer
- Invert Layer Masks Quickly
The fourth tip for mastering the Adobe Photoshop Masking Course like a pro is to focus on inverting layer masks.
For this:
- Select the mask + Press CTRL or CMD + I
- Fill Layer Masks with Black or White Efficiently
The fifth tip for mastering the Professional Photoshop Masking Course is about quickly filling a layer mask with black or white using keyboard shortcuts.
For this:
- Press D (to set default colors) + Press CTRL or CMD + DEL (with the layer mask selected) = Fill with the foreground color
- Use Keyboard Shortcuts for Layer Masks
The sixth tip for mastering advanced layer mask techniques is to create custom keyboard shortcuts to speed up your workflow.
For this:
- Open the Edit menu + Select Keyboard Shortcuts + Customize shortcuts for layer mask commands
- Copy Layer Masks Between Layers
The next tip for mastering the Photoshop Masking Techniques Course shows how to copy a layer mask from one layer to another.
For this:
- Hold Alt + Drag the layer mask to the new layer = Duplicate the layer mask
- Adjust Layer Mask Density and Feathering
The eighth tip for becoming a pro by learning Adobe Photoshop Masking Course involves fine-tuning your layer masks. That is to say, you can adjust the opacity of a mask and add feathering to its edges through the Properties Window for smoother transitions.
- Add a Layer Mask with a Keyboard Shortcut
Another popular tip on the list of the top 10 tips for mastering layer masks is to learn how to quickly add a layer mask.
For this:
- Press Option on Mac (or Alt on Windows) + Click the ‘Add Layer Mask’ button = Add a layer mask
- Delete Layer Masks Easily
The tenth and final tip for creative layer masking is about deleting layer masks.
For this:
- Right-click the layer mask + Select Delete from the tooltip menu = Remove the layer mask
Conclusion
In conclusion, mastering layer masks in Adobe Photoshop is your ultimate ticket to precise editing and blending in your images. Through this beginner’s guide, we hope we’ve been able to cover the basics and some advanced techniques that are sure to help you with creative layer masking.
Trust us, with the right practice and creativity, you can instantly master the art of creative layer masking and unlock endless possibilities for image editing and compositing in Photoshop.
So, Photoshop enthusiasts, are you gearing up to experiment with layer masks and elevate your Photoshop skills to new heights? If yes, then don’t wait for the perfect moment. Is Adobe Photoshop worth learning? Absolutely! Enroll now in our comprehensive Adobe Photoshop Masking Course at Skilcamp and start creating layer masks like a pro today!
FAQ
1. What does a layer mask do in Adobe Photoshop?
Ans. A layer mask in Adobe Photoshop allows you to hide or reveal portions of a layer without permanently altering the image. By using black, white, or shades of gray on the mask, you can control the visibility of different areas, Making it a versatile tool for blending, compositing, and making non-destructive edits.
2. How to do layer masks in Photoshop CS6?
Ans. For doing layer masks in Photoshop CS6, first, create a layer mask, then, select the layer you want to apply the mask to, and click the “Add Layer Mask” button at the bottom of the Layers panel. After that, you can paint the mask using black to hide parts of the layer, white to reveal parts, and gray for partial transparency. You can also create a mask from a selection by making your selection first and then clicking the “Add Layer Mask” button.
3. How many layer masks can be applied?
Ans. You can apply one layer mask per layer in Adobe Photoshop. If you need to apply multiple masks, you can do so by using adjustment layers or layer groups, each with its own mask.
4. How many types of layer masks are there in Photoshop?
Ans. Photoshop primarily offers two types of layer masks. One is the vector masks and the other is the raster (or pixel) masks. Vector masks use paths and are resolution-independent, while raster masks use pixels and allow for more detailed and nuanced masking.
5. What is the purpose of masking in Photoshop?
Ans. The purpose of masking in Photoshop is to control the visibility of different parts of a layer in a non-destructive manner. It allows you to make precise adjustments to an image, blend layers seamlessly, and perform complex edits without permanently changing the original content.


Leave a Reply